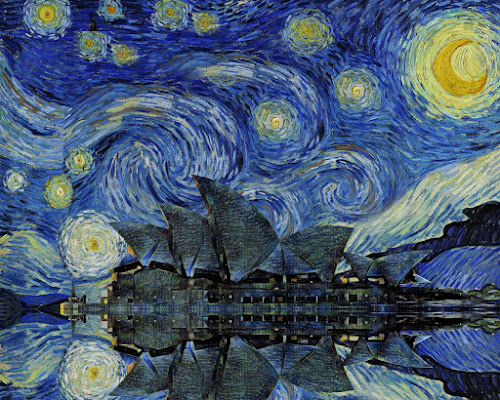
Need to design a poster for an event called "Van Gogh Comes to Sydney"? Don't worry, we got you covered. In this tutorial, we will be going over how we made the image of the Sydney Opera House under Vincent van Gogh's Starry Night.
You will need:
- Infusion, downloadable at https://insightfulai.github.io/infusion/testing.html.
- Photo editing software, such as Photoshop (paid), Affinity Photo (paid), GIMP (free) or Paint.net (free)
Step 1:
First, we download photograph of the Sydney Opera House and a photo of Starry Night.
Credit: Simon Clayton (https://www.pexels.com/photo/sidney-australia-opera-house-1983162/)
Credit: Vincent van Gogh, Google Cultural Institute (https://commons.wikimedia.org/wiki/File:Van_Gogh_-_Starry_Night_-_Google_Art_Project.jpg)
Step 2:
We open Starry Night in our photo editor. Then we cover up the cypress tree by duplicating the original artwork and using it as a patch. This will be the background of the final artwork.
Next, we cut out the Opera House from the photo and we overlay it over our edited Starry Night background. Then, we black out the area beneath the Opera House. You will end up with this image which we can feed into Infusion.
Step 3:
Then, using Infusion, we generate an artwork of the Opera House in the style of Starry Night. We use the image we made before in Step 2 as the content image, and we will only use the foreground of Starry Night as the style image input in Infusion. This is because we want the Opera House to be in the foreground of the our final work so the style of the opera house should be more consistent with the foreground of the original Starry Night.
The crop of Starry Night that we used as the style image.
You should end up with an image similar to this as the output:
Step 4:
We take the output image we obtained from the last step, and again we crop out the opera house, like in Step 2. We overlay this image over the background we created in Step 2.
Things are starting to take shape! We just need to add some finishing touches.
Step 5:
We mirror the image to add a reflection below the Opera House.
To make the reflection look more realistic, we add a wavy distortion to it and we darken the water with a black-to-transparent gradient that gets lighter the further it's away from the shoreline.
Step 6:
Finally, we use tools such as clone stamps to retouch the elements in the background that look out of place. And we're done!


Comments
Post a Comment